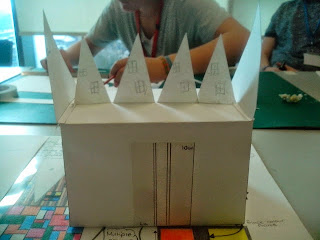
The past 8 weeks we have been looking at modern architecture including 4 architecture artists. For modern architecture we went into Barnsley town center and captured couple of photos of buildings around Barnsley. Also, for looking at 4 architecture artists we had to create research sheets. with all the artists work and a small amount of information about the artist. Our intended outcome was to have completed all the research sheets and have a final design and model of our very own modern building. When we began looking at 4 modern architectures, i chose architecture artists who people have never heard of before. Because i wanted to show more creative side for this project. Also, we had to choose various images of our chosen artists work. Then, re-create them, in different media such as; paints, coloured pencils, collage and pastels. Once all our sheets were completed and at a good standard of research we then had to create a design sheet of our very own modern architecture building. The artist i looked at was Tom Fruin, the reason why i chose him. Is because he has a great way of expressing colour into his work. And i liked how he uses bright colours and shows these colours by putting them into a rubeic cube way. Once i got some images of Tom Fruin's work i then got A3 paper and started my design sheet based around his work. I wanted to create a basic and simple building such as; rectangle base with triangle roof top. But we couldn't make our buildings big, only to a simple standard. On my design sheet i also had to make sure i added measurements and methods of how i was going to create my model. Furthermore, adding alot of colour. For my rectangle bottom base design i decided to use Tom Fruin's design with the colourful rubeic cube way. With the triangle rooftop design i decided to have stripy with dark brown, light brown and cream colours. Giving it a licquise effect (sweet). All together on my design sheet, my model has a charlie chocolate factory look a like in my opinion. Because it makes you imagine sweets and chocolate. At the time i had finished my design sheet, i couldn't go into the workshop to make my model. Because the workshop was full, but i was told to have a cutting sheet for the materials i was using to make my model and double check of the sizes and measurements. For my model design i needed: 6 triangles, 1 rectangle base, 10 squares (for windows) and 1 rectangle for my double door. The materials i chose was; clear plastic and wood. The colours i chosen was; red, blue, yellow, orange, green, purple and pink. After i completed my cutting sheet for all my pieces, i then had to make a template showing exactly what i wanted my building to look like. The things what went well was creating the exact design for my model and finished research sheets to a good standard. The things what went wrong was; the measuring and making the template. Because there were pieces what didn't fit, with them being different sizez. Everything else was good. I did enjoy this project, it was really intresting and fun to do. But, i wasn't too happy. Because i still haven't made my model.