Thursday, 1 May 2014
Experimental portrait evaulation
For my experimental portrait i strongly believe that my time management was handeld really well. Because i was really into the project and working on protraits. Plus, i show a really creative side when i work on something i am intrested in. Even though we only have 2 hours on Monday's lesson. I still managed to get my experimental portrait finished and done upto a outstanding standard, in my opinion. I didn't finish the experimental portrait straight away, once the porject was set it took me a week to get it fully completed. Because i had other work set and needed doing before the experimental portrait project ended. I chose Amy Critchley for my experimental portrait. Because on the table i was sat at, Amy and Zoe had already made decisions to draw each other. But, i decided if we did each other such as; Amy draws Zoe, Zoe draws Me and i draw Amy. Once our choices were final on who's drawing who, we then had to get a camera from Media on floor 5 and take various photos of each other. The only photos we could have were from the head to chest only. We took 10 photos at least of each other, once we took the photos we headed back upstairs. From there we then had to chose only 4 photos. The 4 photos we had to chose, had to be good. Finally, when i chose my best 4 photos of my model i then had to come to a decision which photo i would like to draw for my experimental portrait. In my opinion i could have chosen a better photo of my model such as; pulling a face or hand covering face. Because the photo i chose of Amy was a simple and basic photo of her, were she was standing and looking straight ahead at the camera with a smile. Before i could start drawing my model photo, we could use a easier way to draw a portrait by using a method called 'Grid method'. In my opinion, i perfered to get on with my portrait. Because if i used the grid method, it would take me ages to get my portrait completed with filling in all the small squares. But, with me drawing alot at home i feel alot more comfortable without the grid method. So i began straight ahead drawing my model photo. When i got all the outline and detail done and accurate. I had to decide where and what techinques i learnt in various lessons such as; ink, black paper with brown paper and newspaper, emulsion, black paper. I tried making my portrait crazy and outstanding as possible by using all these techiques. Firstly, i had the idea to have a ink background but the ink didnt look right for the background. So instead i put emulsion all over the ink back ground. But i did have ink effect on my model, so i decided to keep it like that. Because in my opinion, it makes my model stand out and looks really effective. For her hair i chose coloured pencils. Because with coloured pencils they're a nice media to use especially, for hair. It really brings out colour and effect. Also, if you didnt like the colour you could just simply get white or bright colour to bring the image back out. With her jumper she wore, i did perfer to just paint it how the jumper was. But, i was told that i could be more creative and use newspaper, brown paper and black paper and collage it. So i did, but also on the photo she worn her line guard. Which is, Red. So i decided to stick small pieces of black card. It really brought out her line guard with her jumper collaged. I strongly believe that the only challenges i faced was time and decisions on media i was gonna use. Finally, i didnt face any problems during this project.

Thursday, 10 April 2014
Architecture project evaluation
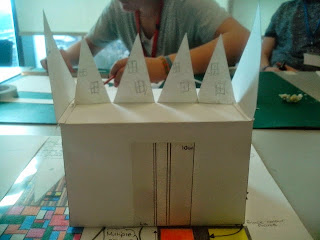
The past 8 weeks we have been looking at modern architecture including 4 architecture artists. For modern architecture we went into Barnsley town center and captured couple of photos of buildings around Barnsley. Also, for looking at 4 architecture artists we had to create research sheets. with all the artists work and a small amount of information about the artist. Our intended outcome was to have completed all the research sheets and have a final design and model of our very own modern building. When we began looking at 4 modern architectures, i chose architecture artists who people have never heard of before. Because i wanted to show more creative side for this project. Also, we had to choose various images of our chosen artists work. Then, re-create them, in different media such as; paints, coloured pencils, collage and pastels. Once all our sheets were completed and at a good standard of research we then had to create a design sheet of our very own modern architecture building. The artist i looked at was Tom Fruin, the reason why i chose him. Is because he has a great way of expressing colour into his work. And i liked how he uses bright colours and shows these colours by putting them into a rubeic cube way. Once i got some images of Tom Fruin's work i then got A3 paper and started my design sheet based around his work. I wanted to create a basic and simple building such as; rectangle base with triangle roof top. But we couldn't make our buildings big, only to a simple standard. On my design sheet i also had to make sure i added measurements and methods of how i was going to create my model. Furthermore, adding alot of colour. For my rectangle bottom base design i decided to use Tom Fruin's design with the colourful rubeic cube way. With the triangle rooftop design i decided to have stripy with dark brown, light brown and cream colours. Giving it a licquise effect (sweet). All together on my design sheet, my model has a charlie chocolate factory look a like in my opinion. Because it makes you imagine sweets and chocolate. At the time i had finished my design sheet, i couldn't go into the workshop to make my model. Because the workshop was full, but i was told to have a cutting sheet for the materials i was using to make my model and double check of the sizes and measurements. For my model design i needed: 6 triangles, 1 rectangle base, 10 squares (for windows) and 1 rectangle for my double door. The materials i chose was; clear plastic and wood. The colours i chosen was; red, blue, yellow, orange, green, purple and pink. After i completed my cutting sheet for all my pieces, i then had to make a template showing exactly what i wanted my building to look like. The things what went well was creating the exact design for my model and finished research sheets to a good standard. The things what went wrong was; the measuring and making the template. Because there were pieces what didn't fit, with them being different sizez. Everything else was good. I did enjoy this project, it was really intresting and fun to do. But, i wasn't too happy. Because i still haven't made my model.


Tuesday, 8 April 2014
Completed Experimental Portrait
Here is my final piece of experimental portrait. I am statisfied with the detail and outlines, including how i managed to draw my model straight away without using the square guide to help us. I really enjoyed this project. Because i love drawing and using different media, especially begin creative in my own way. Instead of people telling me what to do and use. I would like to do more portraits now. Because i strongly believe that i am getting better with my detail and outlines including the media i use.


Tuesday, 1 April 2014
3D model making template
Today's lesson i only had my template to make, of what my model building will look like. It did take some time to measure and make my template exactly how i wanted it like my sheet design. Once i made my template model i couldn't go into the workshop. Because the workshop was full up so i have next week to make my model building.


Experimental Portrait
For Experimental Portrait lesson, we began by taking photos of either ourselves or other members in our class. But we was only allowed to take these photos from chest to head. Because it was easier and more simple instead of going for full body portraits.
On my table we all decided to take pictures of each other and decide to draw whoever once the pictures was taken. Amy decided to draw Zoe, I decided to draw Amy and Zoe decided to draw me. When we got all our pictures (10x at least) we had to come to the decision of only choosing 4x best ones. Once we all chose our 4x pictures each, we then could start drawing our portraits. My tutor recommended that we should use a square guide to help us draw every thing and every detail in step by step with the squares. But I already tried and knew that technique and I was more confident just to draw the photo as I saw it. Also, we had the choice whether to add a background or not. I did, for my background i used ink and acrylic paints. With the ink i firstly poured a little amount on ink onto my page and then got a straw and began blowing the ink in different areas and style. Furthermore, once the ink was dry i then decided to add more texture by putting the acrylic paint into a cup of water and mix it. Once it was all mixed i then used a defuser and blew the acrylic paint on certain areas of my page. Then my page was looking for interesting once it was all dry. I could then start drawing, i at least had to rub it out 2 or 3 times. Finally, i was managing to get all the details and outlines and came out with a great portrait of my model. Once, i finished drawing my portrait i noticed that the background my model was standing was white and my background on my page wasn't. So, i decided to use Emulsion to cover up all the yellow, blue background to make it look exactly like the photo i was drawing from.


Thursday, 27 March 2014
3D Workshop Sculpture making
Today's lesson in the 3D Workshop, we began by going through all the health and saftey when in the workshop and using the equipment. Such as; when using the drill always wear goggels (provided) also when girls use the drill they must always tie their hair back. When using various tools like; saw and filer you need to be careful with how you use them because with a saw someone could cut their fingers and with a filer they could easily break if not used properly. For my model i just went along with certain pieces i chosen, i didn't have no plan or wasn't told what to make. In my opinion it was alot better creating things in our own way and choices instead of being told what to make.


(Tuesday) 3D Triangle Model making
This lesson was all about creating a 3D model out of triangles. Firstly, i began with A2 card and started to cut triangle shapes at one of the corners with a ruler and a craft knife. My triangle shapes i started to cut was too small, so i had to start cutting them bigger so it would save time and my model would be completed before the lesson finished. I wasn't really intrested or happy with this lesson and the model i was creating, because i was sticking the triangles in any place they looked okay at. Furthermore, creating a 3D model out of triangles isnt't something i would like to do.


Subscribe to:
Posts (Atom)